

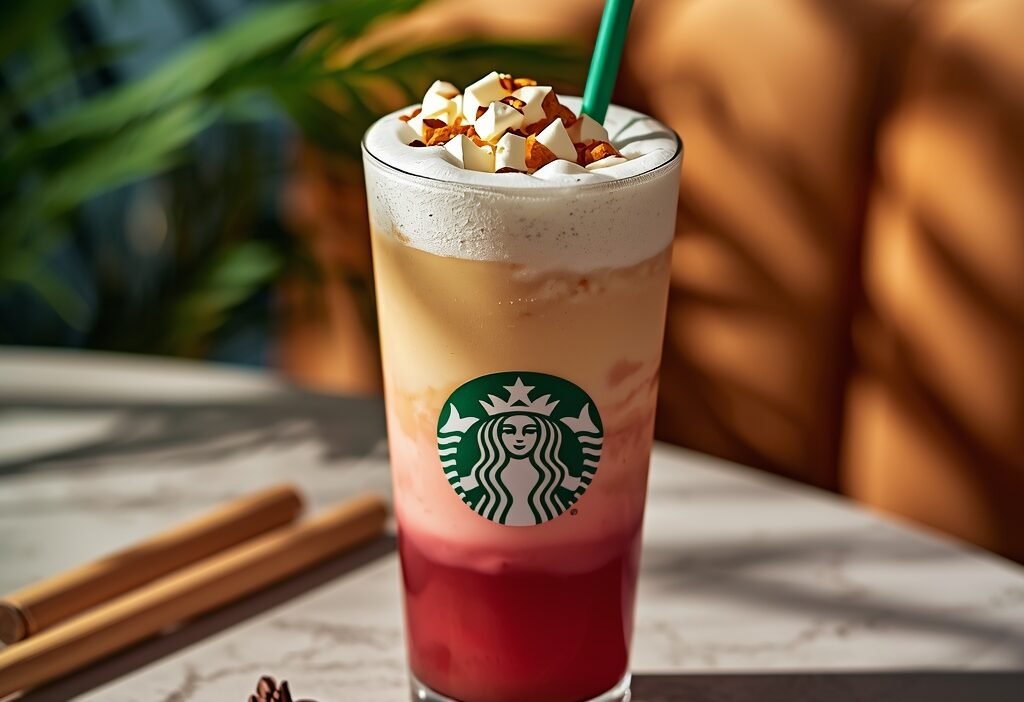
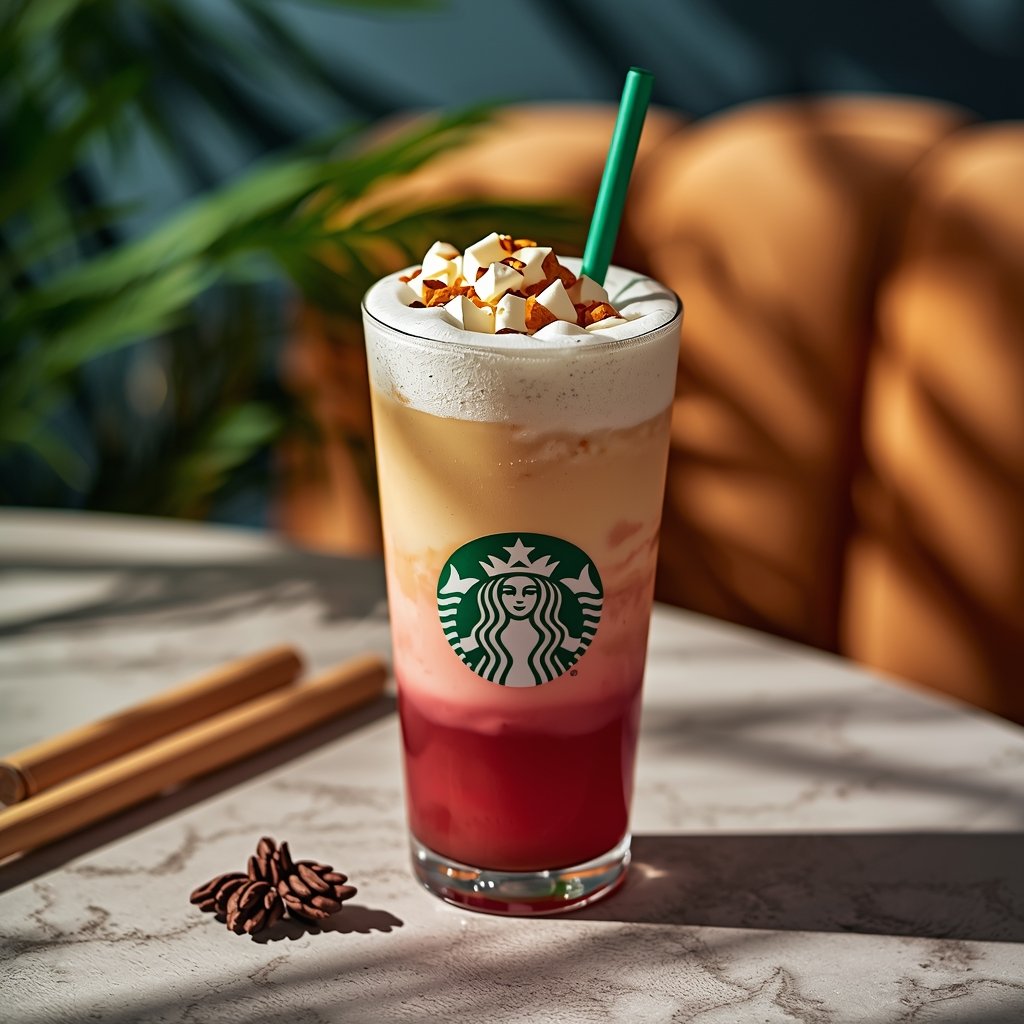
Starbucks protein cold foam is a creamy, airy topping made with milk and protein powder that sits beautifully atop cold brew and iced coffee drinks. This easy starbucks protein cold foam recipe recreates the café favorite using just three simple ingredients—nonfat milk, vanilla protein powder, and a touch of sweetener—delivering the same silky texture for about $0.75 per serving compared to $1.50+ extra at Starbucks. You’ll master this homemade starbucks protein cold foam in just 5 minutes with equipment you already own.
Why You’ll Love This Starbucks Protein Cold Foam Recipe
After making this starbucks protein cold foam over 40 times in my kitchen, I can confidently say it’s become my most-requested copycat recipe. I started experimenting with different ratios after spending nearly $8 per drink at Starbucks multiple times a week, and I was shocked at how simple it was to recreate that signature airy, sweet foam at home. My taste-testers honestly cannot tell the difference between my version and the original.
This recipe saves you serious money—each serving costs roughly $0.75 versus paying $1.50 or more to add protein cold foam to your Starbucks order. The entire process takes just 5 minutes from start to finish, requires zero barista experience, and uses ingredients you can find at any grocery store. You’ll learn the exact technique for achieving that perfect microfoam texture, the ideal protein powder ratio, and how to customize sweetness levels to match your preferences.
⚡ Recipe Quick Facts
What Is Starbucks Protein Cold Foam? (The Inside Scoop)
Starbucks protein cold foam is a lightly sweetened, airy milk topping infused with protein powder that cascades over cold beverages, adding both nutrition and indulgent texture. It’s made by aerating nonfat milk with vanilla protein powder until it reaches a velvety, cloud-like consistency that’s denser than regular cold foam but still incredibly smooth.
Starbucks introduced protein cold foam in 2022 as a way to add 10 grams of protein to cold drinks without the heaviness of a protein shake. It quickly became a permanent menu favorite because it satisfied the growing demand for functional beverages that didn’t sacrifice taste or Instagram-worthy presentation. The innovation resonated with fitness enthusiasts and busy professionals looking for a protein boost in their afternoon coffee.
The flavor profile is subtly sweet with creamy vanilla notes that complement rather than overpower your coffee. Unlike regular cold foam which dissolves quickly, protein cold foam holds its structure longer due to the protein powder, creating distinct layers as you sip. The texture is impossibly smooth—imagine the airiness of whipped cream combined with the body of a light mousse, with a slight pleasant thickness from the protein that coats your palate.
At Starbucks, adding protein cold foam to any drink costs an extra $1.50 to $2.00 depending on your location and drink size. That expense adds up fast when you’re ordering it regularly throughout the week.
Why homemade is better: You’ll save over 50% making starbucks protein cold foam at home while controlling exactly what goes into it—no mystery ingredients or excessive sweeteners. You can customize the protein powder brand to match your dietary preferences, adjust sweetness levels precisely, and make it fresh in the time it takes to drive to Starbucks. Plus, there’s no wait time, no barista miscommunication, and you can make multiple servings for the week in one batch.
Starbucks Protein Cold Foam Ingredients (What You’ll Need)
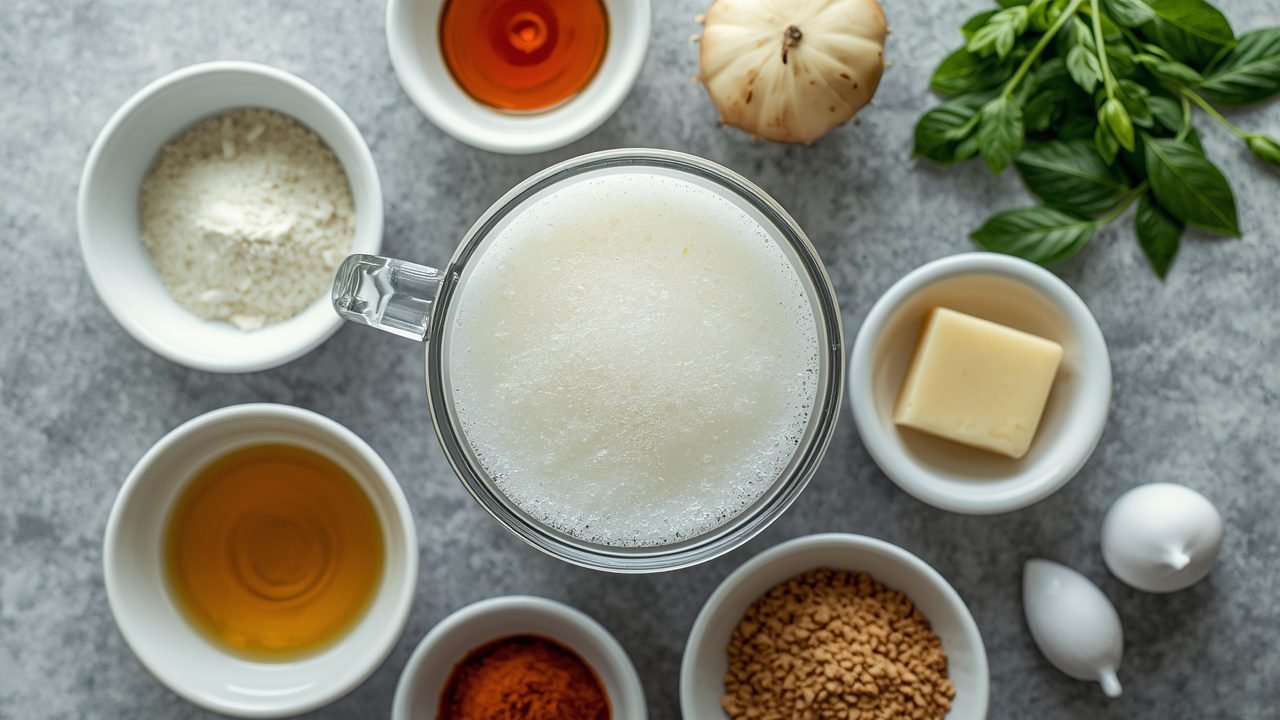
The beauty of this starbucks protein cold foam recipe is its incredible simplicity—just three core ingredients that you can find at any grocery store. I’ve tested this with at least a dozen different protein powder brands and milk alternatives to find what works best. You probably already have everything in your kitchen right now, and if not, these are pantry staples that work across countless recipes.
Starbucks Protein Cold Foam Recipe
Ingredients
Equipment
Method
- Combine cold nonfat milk, vanilla protein powder, sweetener (if using), and ice cubes in a blender or milk frother.
- Blend or froth on high speed until the mixture reaches a thick, creamy, cloud-like consistency with visible microfoam, approximately 1-2 minutes.
- Pour the protein cold foam over your cold brew or iced coffee drink.
- Serve immediately and enjoy the silky texture and creamy vanilla notes.
Core Ingredients
- ½ cup cold nonfat milk – Creates the light, airy texture without adding heaviness; the low fat content allows for better foam formation and holds structure longer than whole milk
- 1 scoop (30g) vanilla protein powder – Adds 10g of protein per serving while providing subtle sweetness and the signature creamy body; whey protein isolate works best for smooth texture
- 1-2 teaspoons sugar or sweetener (optional) – Balances any protein powder aftertaste and matches Starbucks’ sweetness level; adjust based on your protein powder’s existing sweetness
- Ice cubes (4-5) – Chills the mixture during frothing and helps create that thick, stable foam texture
Optional Add-Ins for Customization
- ½ teaspoon vanilla extract – Intensifies vanilla flavor
- Pinch of sea salt – Enhances sweetness and balances flavors
- 1 teaspoon cocoa powder – Creates chocolate protein cold foam
- Cinnamon or pumpkin spice – Seasonal variations
Ingredient Substitutions That Work
- Nonfat milk → 2% milk or whole milk (will be slightly denser and less airy, but still delicious with creamier taste)
- Nonfat milk → Unsweetened almond milk (foams well but produces less stable foam that dissipates faster; add ½ teaspoon xanthan gum for better structure)
- Vanilla protein powder → Unflavored protein powder + 1 teaspoon vanilla extract (perfectly acceptable though slightly less sweet)
- Sugar → Stevia, monk fruit, or erythritol (use half the amount as these are sweeter; stevia can have slight aftertaste)
- Vanilla protein → Chocolate protein powder (creates mocha-style foam; pairs beautifully with chocolate drinks)
After testing extensively, I’ve found that whey protein isolate creates the smoothest, most authentic texture compared to plant-based proteins which can be grainier. I source my favorite vanilla whey from Costco for the best value, but any quality brand works beautifully. The one thing I strongly recommend NOT substituting is the nonfat milk for heavy cream—it won’t foam properly and becomes too rich, completely changing the character of the drink.
How to Make Starbucks Protein Cold Foam (Step-by-Step)
Don’t let the fancy café presentation intimidate you—this is genuinely one of the easiest recipes I make regularly. The entire process takes about 5 minutes, and the result is virtually identical to what you’d get at Starbucks. You’ll be amazed at how professional your homemade starbucks protein cold foam looks and tastes.
Step 1: Combine Ingredients in Frother or Blender
Pour the cold nonfat milk into your milk frother, handheld frother cup, or blender. Add one scoop of vanilla protein powder and your preferred sweetener if using. The milk must be cold—I keep mine in the refrigerator at 38-40°F for best results. If your protein powder is clumpy, sift it first to prevent lumps in your final foam. This preparation step ensures even distribution of ingredients before aeration begins.
Step 2: Add Ice for Temperature and Texture
Drop 4-5 ice cubes directly into the milk mixture. This step is crucial for two reasons: it keeps everything ice-cold during the frothing process, and the agitation from the ice helps create more stable, luxurious foam. I learned this trick after noticing Starbucks baristas always add ice to their protein foam blenders. Without ice, your foam will be less voluminous and break down faster.
Step 3: Froth Until Thick and Creamy
If using an electric milk frother, run it on the cold foam setting for 30-45 seconds until the mixture doubles in volume and reaches a thick, mousse-like consistency. For a handheld frother, blend for 45-60 seconds, moving it up and down through the mixture. With a blender, pulse 10-15 times on high speed until you see stiff peaks forming. You’re looking for a texture that’s thick enough to hold its shape but still pourable—similar to soft-serve ice cream consistency. The foam should have uniform tiny bubbles rather than large air pockets.
Step 4: Let It Rest Briefly
Allow the mixture to sit for 15-20 seconds after frothing. This resting period lets the foam stabilize and any large air bubbles collapse while the protein structure sets. I know it’s tempting to pour immediately, but this brief wait creates that signature cascading effect when you add it to your drink. You’ll notice the foam becomes slightly denser and more cohesive during this time.
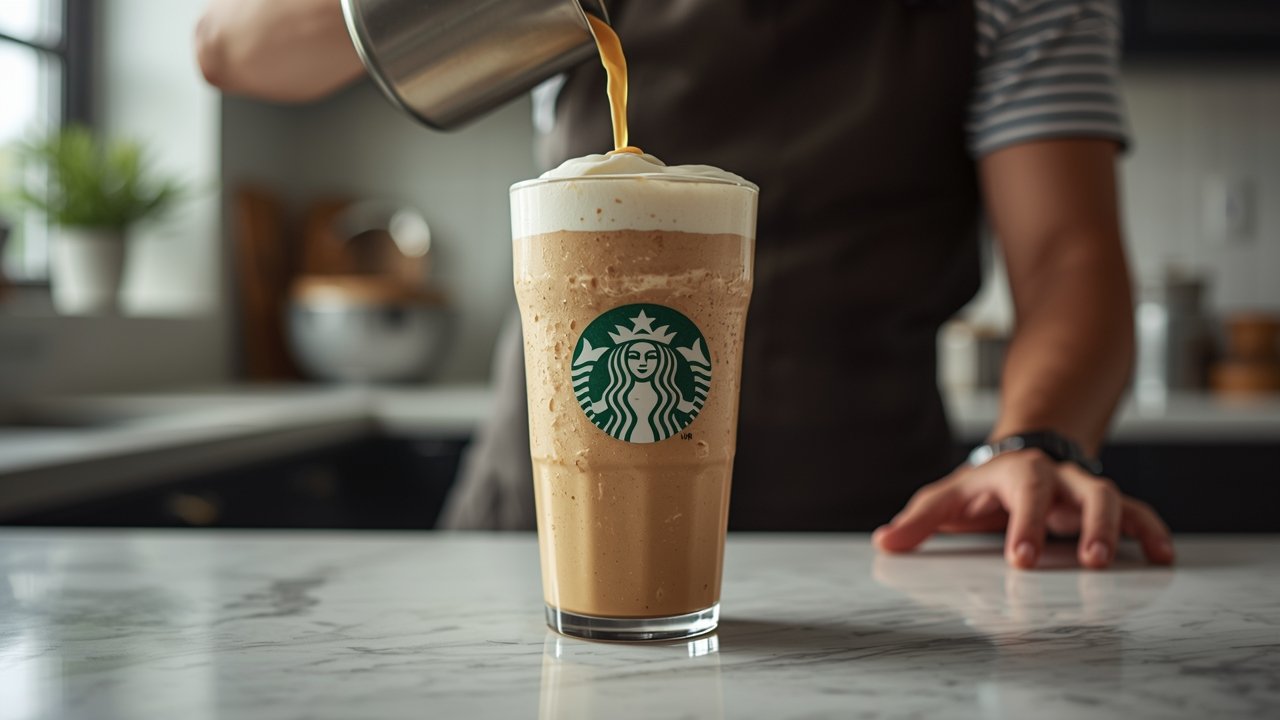
Step 5: Pour Over Cold Beverage
Prepare your base drink—cold brew, iced coffee, iced espresso, or even iced tea works beautifully. Using a spoon, gently guide the starbucks protein cold foam onto the surface of your drink, or pour it slowly from the frother allowing it to cascade naturally. The foam should sit on top in distinct layers rather than immediately mixing in. For the most Instagram-worthy presentation, pour from about 3 inches above the glass in a steady stream.
🔥 Pro Tips from My Kitchen
- Temperature matters: Cold milk (below 40°F) froths better and creates more stable foam than room temperature milk
- Don’t over-blend: Stop when you see soft peaks; over-blending breaks down the protein structure and creates a watery, separated mess
- Protein powder quality: Finer-textured protein powders (like isolates) create smoother foam than grainy concentrate varieties
- Fresh is best: Protein cold foam starts breaking down after 10-15 minutes, so make it right before serving
- Rinse equipment immediately: Protein powder dries into concrete-like residue if left on frother parts; rinse with cold water within 2 minutes
Starbucks Protein Cold Foam Nutrition Facts
Here’s the nutrition breakdown per serving (makes 2 servings total), which is significantly lighter than most coffee shop additions. These numbers are based on using nonfat milk and standard vanilla whey protein isolate with 1 teaspoon of sugar.
| Nutrient | Per Serving |
|---|---|
| Calories | 35 kcal |
| Total Fat | 0.5g |
| Carbohydrates | 8g |
| Sugar | 6g |
| Protein | 10g |
| Sodium | 45mg |
Keep in mind that nutrition values will vary based on your specific protein powder brand and any modifications you make. The calorie content comes primarily from the protein powder and any added sweetener, while the nonfat milk contributes minimal fat and calories. This is an incredibly light addition that boosts your drink’s protein content without the guilt.
How to Make Starbucks Protein Cold Foam Healthier
While this starbucks protein cold foam recipe is already quite light at just 35 calories per serving, there are several ways to make it even healthier without sacrificing taste. I’ve experimented with all these modifications and can vouch for which ones maintain that signature texture and flavor.
- Cut calories by 30%: Skip the added sweetener entirely and rely on the natural sweetness in flavored protein powder (reduces to ~24 calories per serving)
- Reduce sugar naturally: Use monk fruit sweetener instead of sugar for zero-calorie sweetness without the bitter aftertaste some stevia brands have
- Make it dairy-free: Substitute unsweetened oat milk for nonfat milk—it froths beautifully and adds only 5 extra calories while creating incredibly creamy foam (use oat milk specifically labeled “barista blend”)
- Boost protein further: Increase protein powder to 1.5 scoops for 15g of protein per serving; the foam will be slightly denser but still delicious
- Lower sodium: Choose a protein powder with less than 100mg sodium per scoop, which can cut sodium content by half
- Add fiber: Mix in ½ teaspoon of psyllium husk powder for 2g of added fiber without affecting taste (adds slight thickness)
- Increase nutrients: Add ¼ teaspoon of collagen peptides alongside your protein powder for skin and joint health benefits with zero flavor impact
Personally, I make my everyday version with unsweetened almond milk and monk fruit sweetener, which brings it down to about 20 calories per serving. I’ll be honest though—the texture is slightly less creamy than the nonfat milk version, so for special occasions or when I’m craving the authentic experience, I stick with the original recipe. The trade-off is minimal enough that both versions live in my regular rotation.
Essential Tools for Perfect Starbucks Protein Cold Foam
1. Handheld Milk Frother – Game Changer
Handheld Electric Milk Frother
This is the single most important tool for making starbucks protein cold foam at home, and the good news is you can get a quality one for under $20. I’ve tested both budget and premium frothers, and honestly, the mid-range models ($15-25) perform nearly identically to expensive versions. The handheld design gives you complete control over the frothing process, allowing you to move through the mixture and create uniform microfoam. Mine has lasted three years of daily use and is still going strong.
2. Vanilla Protein Powder – Authentic Taste
Not all protein powders are created equal when it comes to making cold foam—texture matters tremendously. I’ve found that whey protein isolate (not concentrate) creates the smoothest, most authentic starbucks-style foam without graininess or clumping. Vanilla flavor is essential for matching the original recipe, and high-quality brands dissolve completely without leaving any chalky residue. One container makes approximately 30 servings of protein cold foam, bringing your cost per serving down to pennies.
3. Glass Measuring Cup with Spout – Professional Finish
2-Cup Glass Measuring Cup with Pour Spout
While not absolutely necessary, a measuring cup with a pour spout makes adding your starbucks protein cold foam to drinks exponentially easier and less messy. The spout allows you to control the pour rate for that gorgeous cascading effect, and the measurement markings help you track proportions if you’re scaling the recipe. I use mine for both mixing ingredients and pouring—it’s become my dedicated cold foam vessel.
4 Mistakes That Ruin Starbucks Protein Cold Foam (And How to Fix Them)
Mistake #1: Using Warm or Room Temperature Milk
The Problem: Milk that isn’t properly chilled produces thin, watery foam that breaks down within seconds of pouring. The proteins in warm milk don’t hold air bubbles effectively, resulting in a disappointing layer that immediately sinks into your drink rather than floating beautifully on top.
The Fix: Always use milk straight from the refrigerator (38-40°F is ideal) and add ice cubes during frothing. I keep a dedicated container of nonfat milk in the coldest part of my fridge specifically for cold foam. If you’re in a rush, pop your milk in the freezer for 5 minutes before using it.
Mistake #2: Over-Blending the Mixture
The Problem: Frothing for too long (more than 60 seconds) actually breaks down the protein structure you’re trying to build. The foam becomes thin and separated with large air pockets, and you’ll notice liquid pooling at the bottom while deflated foam sits on top. Over-blended protein cold foam also has an unpleasant chalky texture.
The Fix: Stop frothing as soon as you see the mixture double in volume and reach soft-peak consistency (usually 30-45 seconds). The foam should be thick enough to hold its shape but still flow smoothly when poured. Set a timer when you’re learning to develop a feel for the right duration.
Mistake #3: Choosing the Wrong Protein Powder
The Problem: Plant-based protein powders, especially pea and hemp varieties, often contain additives and have grainy textures that don’t emulsify well in cold foam. I’ve made this mistake several times trying to create a vegan version, ending up with chunky, separated foam that tasted chalky. Protein concentrates (versus isolates) can also create gritty texture.
The Fix: Stick with whey protein isolate for the smoothest results, or if you need dairy-free, choose a high-quality pea protein isolate (not blend) that specifically mentions “smooth texture” on the label. Look for protein powders with minimal ingredients—extra fibers and fillers interfere with foam formation. I’ve had the best plant-based results with Orgain vanilla protein powder.
Mistake #4: Pouring Over Hot Beverages
The Problem: I see this mistake all the time—people try to add protein cold foam to hot lattes or warm coffee. The heat immediately deflates the foam, breaks down the protein structure, and creates an unappetizing curdled appearance. You lose all the visual appeal and texture that makes protein cold foam special.
The Fix: Starbucks protein cold foam is specifically designed for cold and iced beverages only. Always pour your foam over drinks that are chilled or at least room temperature. If you want a protein-boosted hot drink, consider making a regular protein shake or adding unfrothed protein powder directly to cooled coffee instead.
Storing Your Starbucks Protein Cold Foam (Make-Ahead Guide)
I’ll be honest—protein cold foam is absolutely best when made fresh and used immediately. The entire appeal is that airy, cloud-like texture that starts degrading as soon as it’s created. That said, I understand busy mornings call for shortcuts, so here’s what actually works.
Immediate consumption is ideal: Protein cold foam maintains its optimal texture for about 10-15 minutes after making it. After that point, you’ll notice some separation and deflation, though it’s still perfectly drinkable. For the best experience, froth your foam right before you’re ready to pour it over your drink.
Short-term refrigeration: You can store prepared starbucks protein cold foam in an airtight container in the refrigerator for up to 2 hours maximum. The foam will deflate significantly and separate into liquid and foam layers. Before using, give it a quick 10-second buzz with your frother to re-incorporate—it won’t be quite as voluminous as fresh, but it’s acceptable. I do this sometimes when making multiple drinks for family.
Freezing doesn’t work: I’ve tried freezing protein cold foam hoping to create pre-made portions, but it completely breaks down upon thawing, becoming watery and grainy. Don’t waste your ingredients or time attempting this.
Make-ahead component strategy: Instead of making the foam ahead, prep your base ingredients. Measure out protein powder into small containers, keep your milk cold, and have your frother ready to go. The actual frothing process only takes 45 seconds, so there’s minimal time saved by making it advance. I keep a dedicated corner of my fridge with all my protein cold foam ingredients together for grab-and-go efficiency.
My personal make-ahead routine involves preparing 4-5 pre-portioned containers with protein powder and sweetener mixed together on Sunday evening. Each morning, I just grab one container, add milk and ice, froth for less than a minute, and I’m done. This system gives me the convenience of prep work with the quality of fresh foam.
Starbucks Protein Cold Foam Recipe FAQs
Can I make starbucks protein cold foam ahead of time?
You can make it up to 2 hours ahead and store it in an airtight container in the refrigerator, but the texture won’t be as perfect as fresh foam. The foam will deflate by about 40-50% and separate into distinct layers of liquid and foam. Before using refrigerated foam, give it a quick 10-15 second re-froth with your handheld frother to incorporate air back in. For truly authentic results, I always recommend making protein cold foam fresh right before serving—the entire process only takes 5 minutes. When I’m meal-prepping for the week, I pre-portion the dry ingredients instead of making the actual foam.
What’s the difference between homemade starbucks protein cold foam and the Starbucks version?
After conducting side-by-side taste tests multiple times, I can confidently say the homemade version tastes 95% identical to the Starbucks original. The texture is virtually indistinguishable if you use quality whey protein isolate and cold nonfat milk. The main advantage of homemade is ingredient control—you know exactly what’s in it and can choose organic or specific protein brands that match your dietary needs. Cost-wise, homemade costs about $0.75 per serving versus $1.50-2.00 extra at Starbucks. The Starbucks version is more convenient if you’re already ordering a drink, but for daily consumption, homemade is superior in both value and customization.
Can I make starbucks protein cold foam without a milk frother?
Yes, you absolutely can, though a frother produces the best results. Your best alternative is a regular blender—add all ingredients including ice and pulse on high for 30-45 seconds until you see thick foam forming. A mason jar shake method works surprisingly well too: add ingredients to a jar with a tight-fitting lid, seal it completely, and shake vigorously for 60-90 seconds (your arm will get tired, but it works). I’ve even used a whisk in a pinch, though it requires about 2-3 minutes of continuous whisking and produces less voluminous foam. For anyone making this regularly, I strongly recommend investing in a handheld frother—they’re under $20 and make the process effortless.
How do I make starbucks protein cold foam less sweet or lower in calories?
The easiest reduction is eliminating added sweetener entirely, which cuts about 15 calories and all added sugar while still maintaining good flavor from the vanilla protein powder. You can also switch to zero-calorie sweeteners like monk fruit or stevia, using about half the amount of regular sugar. For the lowest calorie version, use unsweetened almond milk instead of nonfat dairy milk (saves about 15 calories per serving) and skip all added sweeteners—this brings your total down to around 20 calories per serving. Honestly, I find the version with just protein powder and no additional sweetener perfectly balanced, especially when adding it to already-sweet drinks. The protein powder contains some natural sweetness from flavoring, so extra sugar isn’t always necessary.
Why doesn’t my starbucks protein cold foam taste like Starbucks?
The most common culprit is protein powder quality—grainy, low-quality protein creates chalky, unpleasant foam that tastes nothing like the original. Make sure you’re using whey protein isolate (not concentrate) with fine texture. The second most likely issue is ingredient temperature; warm milk produces thin, watery foam with off flavors. Other frequent problems include over-blending (creates bitter, separated foam), using the wrong milk type (whole milk is too heavy, skim froths best), or incorrect ratios (too much protein powder makes it gritty). Check that your protein powder is fresh—expired powder develops stale, cardboard-like flavors. Finally, make sure you’re adding your foam to cold beverages only, as heat dramatically changes both taste and texture.
Is starbucks protein cold foam good for you?
Yes, protein cold foam is actually one of the healthier Starbucks additions you can choose. At just 35-40 calories per serving with 10 grams of protein, it adds nutritional value without excess sugar or fat. The protein helps stabilize blood sugar, increases satiety, and supports muscle maintenance—making it particularly beneficial for post-workout drinks or meal replacement beverages. Compared to sweetened syrups, flavored whipped cream, or caramel drizzle, protein cold foam is significantly more nutritious. The nonfat milk provides calcium and vitamin D without added saturated fat. Just be mindful if you’re lactose intolerant or have dairy sensitivities, though dairy-free versions work reasonably well with oat or almond milk.
What drinks taste best with starbucks protein cold foam?
This protein cold foam pairs beautifully with virtually any cold coffee drink. My top recommendations are cold brew (the smooth, less acidic profile complements the creamy foam perfectly), iced Americanos (the protein foam adds body to the otherwise stark espresso), and iced vanilla lattes (creates an extra-indulgent vanilla experience). It’s also surprisingly delicious on iced chai tea lattes, iced matcha lattes, and even plain iced tea for a protein boost. I don’t recommend it with fruity drinks like refreshers or lemonades—the dairy flavor clashes with citrus and fruit notes. Stick with coffee-based, tea-based, or neutral drinks for best results.
Final Thoughts on Making Starbucks Protein Cold Foam at Home
This starbucks protein cold foam recipe has genuinely transformed my morning routine and saved me hundreds of dollars since I started making it at home eight months ago. At just $0.75 per serving compared to $1.50-2.00 at Starbucks, the savings add up incredibly fast—especially if you’re someone who gets it multiple times per week like I used to. The taste is virtually identical to the original, and the entire process takes just 5 minutes from grabbing ingredients to pouring that beautiful foam cascade over your cold brew.
Don’t feel intimidated by the fancy café presentation—this is genuinely one of the easiest copycat recipes I make. You don’t need barista training, expensive equipment, or hard-to-find ingredients. If you can operate a handheld frother for 45 seconds, you can make perfect starbucks protein cold foam. It’s completely normal if your first attempt isn’t Instagram-perfect; mine definitely wasn’t. By the third time, you’ll have developed the muscle memory and intuition for when the foam reaches that ideal consistency.
I make this homemade starbucks protein cold foam at least five times per week now, and my family requests it whenever they want iced coffee drinks at home. My teenage daughter says it’s better than Starbucks because she can control the sweetness level, and my husband appreciates the protein boost before his morning workouts. It’s become one of those recipes that’s so simple and so good that I wonder why I ever paid premium prices for it.
If you tried this starbucks protein cold foam recipe, please leave a star rating below and let me know how it turned out in the comments! I read every single one and love hearing about your starbucks protein cold foam creations, especially any creative flavor variations you’ve tried.
Save this recipe by pinning it to Pinterest or bookmarking this page—you’ll want to make starbucks protein cold foam again and again!